Just a few changes on this one: changed the blue on her hat to pink, changed the blue knitting needle ends to pink, omitted the eyeshadow, used 815 for the backstitching on the chair instead of black, and used the lighter shade of green for the ball of yarn.
Still two behind... but only two behind! Happy Stitching!
So I was doing a little finishing Monday morning, and inexplicably threw out my back. Leaned over... leaned back... WHAM! I guess I'm getting old. Anyway, that totally shut down my week, since for the first couple of days I was hobbling around like a little old lady, couldn't lift anything, couldn't bend over. No housekeeping for me. Mr. Wonderful ordered me to stop trying to continue my domestic commando activities, and took over. He's been taking care of laundry, food, errands... he even took Tiger Lily to the vet last night after work (a double ear infection... like last winter... poor thing). I've been able to move around quite a bit more today and have even been (carefully) doing laundry, but for most of the week I've just been sitting and stitching. I picked up the Woodland Birdies again after a long break. I stitched the owl last year, and just finished the woodpecker. Now I'm on to the quail.
This is the ornament I was finishing when my back exploded.
This is Mr. Wonderful's 2014 ornament, from the 2014 Just Cross Stitch Christmas Ornament issue. I found the trim in the upholstery section of a craft store in California years ago and dug it out of my finishing stash. The tiny holly garland is from Hobby Lobby, and I found it in their Christmas craft section a year or two ago. I don't like my ornaments to be fussy, so I usually don't add bows or tassels or anything like that. Sometimes I do, but not usually. And Mr. Wonderful's ornaments are always "bow-less," but I thought maybe a little garland would look nice on this one, to pull out the green of the tree and balance all the red. If I find something I like better when the Christmas crafts come out this year, I may change it, but for right now I like it. We're on the mend around here... I'm getting around better and Tiger Lily is feeling better, too. We're just sitting around stitching and resting. We both have a good excuse! Hopefully I'll have that little quail done and ready to show off soon.
Here's another project I'll be working on throughout the year. This is Woodland Sampler from The Frosted Pumpkin Stitchery. My plan is to stitch one block a month. I'm stitching it on 28 ct. mushroom evenweave. I changed the border color to DMC 839 to better match the fabric (which is darker than the model), and I changed the word "January" to DMC 156.
I've got a bunch of other projects going (unusual for me), so I'm only working on this project for about the first week of the month. Progress won't be as fast as it could be, but I'm thoroughly enjoying stitching this sampler. Here's my January progress, before I put it to bed until February.
For info on fabric and color changes, click on the "Snowfire Christmas" label.
I've been gluing my fingers together again! A while back, I posted pictures of some needle minders I made out of old costume jewelry. I was pretty happy with how they turned out, so I decided to make some more. Because I need a needle minder to match every project. I couldn't care less about shoes for every outfit, but needle minders are another story. This time I raided the jewelry-making section of Michael's and picked up a few charms. This first one is my favorite, even though I was hoping to find something more like a tiny picture frame with flat glass. I'm pretty sure Hobby Lobby has them, but I'll have to wait until later in the week to check. I can always make more... especially of the Stitchy Supervisor! A Tiger Lily needle minder!
Here's what they look like unassembled. I used a tiny amount of super glue on the tip of a toothpick and dotted it around the edges to assemble the pieces. I also used pliers to remove the loop.
Sometimes you can't remove the loop without damaging the charm, and in that case you can just glue on a little bead or a flat-backed crystal, as I did with these next two, a Celtic knot and a bird's nest.
This last one was an experiment, just to see if it would work. I found this tiny teacup in the miniature section and hot-glued magnets to the bottom (the super glue wouldn't bond to the ceramic). I think it's charming!
Public Service Announcement: nail polish remover with acetone will remove super glue from skin. News you can use!
I've said it here before, I'll say it again: One of the joys of being a stitcher is that you find yourself delighted by very simple things. And the ability to be delighted by very simple things seems to be something we lose as we age and life gets more complicated. I think that capacity for joy and fun keeps us young... or at least young at heart. There is a sense of "play" in needlework. Pretty colors of fabric and floss in endless combinations. "Toys" of all kinds, from sparkly needle minders to scissors in our favorite color. Rainy afternoons spent "playing" in--also known as "organizing"--our stash. Daydreaming about our next project. All of those things are just fun, and fun is good for you! And we haven't even gotten to any actual stitching yet! Something else that's fun about being a stitcher is always being on the look-out for goodies that can be turned toward stitchy uses. Sometimes you find stuff in the most unexpected places. Yesterday, Mr. Wonderful and I had a rare day out together, and one of our stops was Home Depot. Look at this cool set of boxes I found for less than $8!
The big one measures roughly 10" x 4" x 6" and the little one that fits inside measures roughly 7" x 1 1/4" x 4 1/2". They had this purple color and the teal color you see on the sticker on the top of the box. These are perfect for stitchy tools and small projects. An assembled 6" x 6" q-snap will fit in the bottom of the large box, under the large tray, and the lid will still snap shut (you have to leave out the smaller box). The more I fiddle with this set of boxes, the more I'm tempted to go back and get a few more, maybe to put by for small gifts. They're just neat little boxes. More goodies. Found this beautiful fox puzzle at A.C. Moore, along with this super cute fat quarter of fabric I'll be using for finishing Christmas ornaments. See those little foxes?
Also found some pretty silver acorn charms to use in finishing. These have a nice weight to them.
Those are my fun finds from yesterday, and here's something else from yesterday. These weird tiny snow pellets were all over the ground when we went out in the morning. It's called "graupel." We'd never heard of it.
Isn't that strange? We've got more interesting weather on the way, so I'm off to tidy my sewing room and hopefully start a new project, because there's just nothing better than stitching when it's nasty outside. Happy Stitching! And remember to keep an eye out for stitchy goodies in unexpected places!
...and because I'm excited!, I'm sharing a little sneak peek of my progress on a SAL in which I'm participating. It began on New Year's Day, and the project is whatever design you've been really, really wanting to stitch but just haven't got around to yet. The updates are supposed to be shared on the 15th of each month, but I can't wait until next week. I'm too excited to finally be stitching this, and I'm too happy about how it's turning out, especially since I've made my usual numerous changes. Over on the right, you'll see a picture of Just Nan's Snowfire Christmas, which I'm stitching as a wedding sampler for our Christmas wedding 14 years ago. Better late than never, right? In a way, I'm actually glad it's taken me this long to stitch this, because if I had stitched it all those years ago, I probably would have stitched it exactly like the picture. The model is beautiful, which is why I chose it, but at this point in my stitching life, I'm much happier with customizing things. For this project, I've made the following changes: *fabric is 28 ct. Valor, from Picture This Plus *DMC #12 Perle Cotton 712 changed to blanc *DMC 712 changed to blanc *DMC 3731 changed to 777 *pale rose gold beads changed to silver *cream pearl beads changed to pearl *champagne beads changed to ice When I chose the green fabric instead of the antique white used for the model, I also swapped the ivory/cream colors for white/pearl and swapped the gold for silver. I wanted a snowy/icy look, and I wanted the snowflake motifs to stand out more on the green fabric. Also... breaking news... I'm obsessed with green fabric. (Long-time readers nod sagely.) So here's what I've got so far!
I am happy, happy, HAPPY with this so far. And I couldn't wait until next week to share. Hope your beginning-of-the-year stitching is going just as well! Happy Stitching!
For me, playing with color is one of the most enjoyable parts of stitching. I am constantly changing colors in designs, sometimes just swapping out one or two, and sometimes doing a complete color conversion. I absolutely love seeing other stitchers' color conversions. The creativity is so inspiring, and being comfortable with doing color conversions makes me more likely to purchase designs I might otherwise ignore because I don't like the colors. I often hear stitchers say they aren't very good with changing colors, and it's definitely the case that not everyone perceives color in the same way. If you're curious about your color acuity (how well you perceive color), there are free online quizzes where you can test yourself. Happily, there are also some very helpful tools and simple ways to make color conversions easier. Here's how I do it... My most useful tool is my DMC Color Card. They're not cheap, but they're worth every penny if you stitch a lot and like to swap colors. I couldn't manage without mine. If you get one, make sure it's one with the actual thread samples. Here's what they look like unfolded... wonderful, huh?
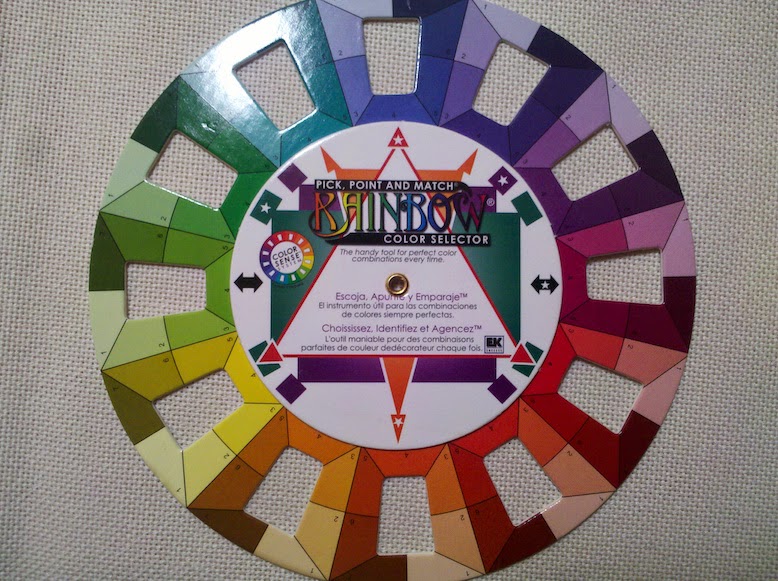
These little color wheels are also pretty useful for creating harmonious color combinations. They're keyed with shapes and symbols to make it easy to choose complimentary colors of the same value. They're available in the art supply department of any craft store.
The first thing I do when I'm setting about to do a color conversion is pull out all my floss. This is easy for me because it's stored on bobbins--in numerical order--in only 4 floss boxes (the variegated colors live in their own box). If you store your floss in baggies or use some other system, this might be a little more difficult for you. I like to be able to quickly pull colors and put them back, which is why I like to have all the colors in front of me. This makes me drool (it also makes my eyes hurt):
The next thing I do is pull the colors called for by the designer and group them as they're used in the design. This is like making a map of how color is used in the design, and I follow the map when I change the colors. The photograph below is of the original colors. As an example of how my map works, you can see that there are 4 shades of purple, used from darkest to lightest. When I swap colors, I know I need 4 shades, from dark to light, of either a different purple or of a completely different color. This is where the color card is invaluable. I can quickly look at the color card and find the shades I want to use, already organized from dark to light. Trying to do this while just looking at a color key on a chart will drive you nuts. You need to see the colors and how they work together. Original colors:
These are my changes:
When I have pulled the designer's colors, I then begin selecting my own and I lay them down, color for color, next to the originals. I had a photograph of this, but my camera ate it and I didn't realize it until I had put everything away. So we're missing the "in progress" shot, but you can see clearly what I did in the "original" and "new" shots. I'm not a huge fan of super bright "jewel tones" and so I simply softened the colors. Here's the new color palette:
The colors are still rich and vibrant, but they're considerably softer than the originals and will give a totally different look to the finished design. Good luck with your color conversions and happy stitching!
Sometimes... no... often, very simple things can add joy to everyday life. One of our winter traditions is a small basket filled with packets of cocoa, cider, and cappuccino that sits on our kitchen table. I got a new basket this year (50% off--$4.50!) and filled it with our favorites. Nothing fancy, just stuff from the grocery store. Could we skip the basket and just rummage around in the pantry or the tea cupboard and get what we want out of the boxes? Yep. Would it be as cozy, and homey, and Christmas-y as the pretty little basket that sits on the table? Nope.
As you walk by the table, you want to pause, choose a packet, heat the kettle, and make yourself a cup of something hot.
This would make a great gift. You could make it as fancy or as simple as you like. For a more elaborate gift, make a decoration for the basket out of felt or stitch something, finish it as a flat ornament and attach it to the basket. Fill it with homemade or special mixes. If you just need a quick, simple, inexpensive but thoughtful gift, buy a decorated basket and fill it like we do, with grocery store goodies like flavored cocoas, cider, tea, and cappuccino. There are always tons of cute baskets to be found around the holidays, and you can always get them on sale or with a coupon. Or just make one for yourself. Who couldn't use a little more coziness?
I love this little freebie. So many possibilities for colors and embellishments. I finally got the finishing done... just in time for Christmas.
Here's a close-up of the edges. I glued on some white braided trim, then pinned some fuzzy, sparkly stuff over it. Because you can never have enough sparkles. Especially at Christmas.
The Stitchy Supervisor stopped by...
...to help...
...by lying down on the batting.
This was so helpful that I had to stop what I was doing. I highly recommend help from a kitty when you're trying to do some finishing. It's so... helpful.
Do the interwebs really need another finishing tutorial? Probably not. But I'm going to post one anyway. There are tons of finishing tutorials out there and most of them will probably be better than this one... more detailed, better photographs, prettier results. So why am I posting another one? Well, two reasons. 1) A lot of stitchers seem to be "intimidated" (their word) by finishing their work, which bugs me. All finishing involves is the stuff we used to play with when we were little: paper, glue, scissors, sparkly stuff. If you can stitch, you can finish. If it doesn't have teeth and claws, let's not be "intimidated" by it. Let's just get out all our supplies and make a mess and finish stuff. 2) Given that so many stitchers are hesitant to finish their own work, I wonder if part of that has to do with the tutorials themselves. Could it be that stitchers think that if they don't have a lot of expensive tools and/or can't produce heirloom-quality results, they can't finish? I don't know. Here's what I do know: this tutorial will not be beautifully photographed, won't require special tools, and isn't aiming at a gorgeously crafted heirloom that will be lovingly passed down from generation to generation for 200 years. This tutorial's goal is: let's get this finished so we can enjoy it. That's it. If you visited my Christmas Open House, you know about our ornament tradition and how special it is to us. The ornaments I finish are priceless to us, but really, the point is to get them finished so they can hang on the tree and be enjoyed. Why take the time to stitch something and then let it live in a drawer because we doubt our finishing skills? Or because we can't afford to have it professionally finished? Besides, Christmas trees are magic and anything you hang on them becomes beautiful. So there. You probably noticed that I finish everything as a flat ornament. I think those fat little pillow ornaments are so cute, but the reason I finish everything flat is simple: space. All of those ornaments you saw fit into a 12" x 7" x 7" plastic storage box lined with acid-free tissue paper. If you have limited space, flat ornaments are the way to go. You can store oodles of them in a large shoebox. And it makes tree decorating a breeze. Pop up the pre-lit tree. Pull out your shoebox (store the hooks in the box!). Hang your ornaments. Your tree is done in 20 minutes and looks fabulous. Okay, ready to make a mess? Let's get started. My very first TIP for you: If you don't want to practice your finishing skills on an ornament you love, either use an old one you don't mind experimenting on, or stitch up a quick little freebie to use. You'll figure stuff out as you're doing it, and I'll bet that it will only take one or two practice ornaments before you feel comfortable working on a "real" one. Stuff you need: *mat board and foam core (you can get these in large sheets at any craft store that has a framing department) *ruler (a clear one works well) *fabric scissors *kitchen shears or other heavy scissors *batting *fabric for the back *X-acto knife (craft knife... mat knife... whatever. Something super sharp to cut the foam core) *double-sided tape *glue (I use Aleene's Fast Grab Tacky Glue... super sticky and bonds quickly) *pins... lots and lots of pins *ribbon and trim *Fray Check Here we go! Weeeeeeeeeeee!!! STEP 1: Measure to determine how big you want your ornament. I like to leave a very small margin, just 1/4" all the way around the stitching, but it's your choice. Write down the measurements so you don't forget, like me. Trim the excess fabric--if necessary--to make it easier to work with, but be careful not to trim too much. Leaving a little more than you need is better than trimming too closely.
STEP 2: Use your measurements to cut your mat board (I use kitchen shears for this) in the size and shape you need. This will be the back of the ornament. Then use your mat board piece as a template to cut your batting, your backing fabric (leave a 1/2" border around it!), and your foam core. TIP for cutting foam core: Your foam core will probably be 1/4" thick and trying to cut it in one go can be difficult and possibly hazardous! Make two cuts. On your first cut, just go around your pencil line with your knife using only enough pressure to cut about halfway through the foam core. Applying less pressure makes it easier to control the knife (and safer!) and get a more accurate cut. On your second cut, cut the rest of the way through the foam core. Use an old magazine or catalog underneath to protect your surface. When you're done with this step, you'll have your mat board, batting, fabric, and foam core ready to go.
STEP 3: Use a little piece of double-sided tape to stick the batting to the foam core. Position the mat board on the backing fabric, and clip the corners as shown below (not too close to the mat board!). It will give you nicer corners. Glue the little corner tabs in first, then glue the side pieces of fabric to the mat board, fiddling with it to make the corners nice and sharp. TIP: Your best tools are your fingers. I use my fingers and thumbs to smooth the fabric into place over the glue. Of course, I get glue all over myself, but it easily rubs off.
STEP 4: Position and pin the design to the side of the foam core with the batting. Take the pins out and re-position and re-pin. Repeat. Okay, I just decided to go ahead and write that out because it's probably what you'll be doing. It's what I do. If there's a step that's even moderately difficult, this would be it. It's not really difficult, it just takes some fiddling to get the design pinned on straight, even, etc. Mostly I just eyeball it, but occasionally I do check it with the ruler. TIP: As you're pinning/positioning, leave the pins sticking out. It will make it much easier to take them out and re-pin. When you're happy with the position, push the pins in. Glue the excess fabric to the back of the foam core, using the technique used to clip and glue the backing fabric to the mat board. You may need a couple of extra pins in the corners to make them nice and sharp.
STEP 5: Measure and mark the center of the mat board, and attach the ribbon for the hanger to the center, so the ornament will hang level.
STEP 6: Glue the mat board back to the foam core front.
STEP 7: Put your ornament under a heavy book and weight it down with a concrete pig named Petunia. Allow it to sit for about an hour or so. If you're worried about glue squishing out, place the ornament between layers of wax paper before mashing it.
STEP 8: Attach whatever trim you're using. You'll notice that some trims, especially the woven ones, will unravel dreadfully when they're cut. Just dab a little Fray Check on the ends and allow it to dry. If you don't have any, craft glue will work as it should dry clear, if a little dark. From what I've observed, most people use twisted cording, but I prefer the variety of purchased trim. TIP: When hunting for trim, besides the fabric department, don't forget to check the home decorating/upholstery department. They usually stock all kinds of interesting trim and matching tassels. Depending on the trim, sometimes I glue it on, sometimes I pin it. When I pin it, sometimes I use dressmakers pins that I can hide in the trim, and sometimes I use pearl head pins because I want them to show. It all depends on the look you're going for. TIP: If you like the look (and ease!) of trim pinned on with pearl head pins, keep an eye out for them at different craft stores. They come in a wide array of colors, and different craft stores stock different brands with slightly different colors. It's possible to assemble a collection of pins that fits any color need, like this. Here's the finished ornament:
Made perfect by the magic of the Christmas tree:
Just a couple of other things. Once you get the hang of finishing, you'll want to branch out to shaped ornaments... circles, ovals, hearts, triangles, etc. Plastic templates used for scrapbooking are perfect for ornament templates, as are cookie cutters. Keep your eyes open for interesting trims, colored pins, beads, charms, ribbon... anything that can be used to embellish your ornaments. You can almost always find this stuff on sale, or use a coupon. Check the remnant bins for backing fabric, or buy fat quarters used for quilting when they're on sale. There's really no limit to what you can do with your finishing. You can make your ornaments as plain or as fancy as you like (I resist the urge to put bows on Mr.Wonderful's ornaments). It doesn't have to be expensive, and as I hope I've just demonstrated, it doesn't have to be difficult. Happy finishing!
Doesn't feel much like winter here right now... sunny and 40. But I think the Old Man is just trying to lull us into a false sense of security. I'm not fooled, and if you've been visiting for a while, you know that I use winter weather as an excuse a reason to stock up on everything--including stash! You don't want to be caught without those beads or that certain color of silk during a blizzard. That would be awful. So... These are the materials for Just Nan's Snowfire Christmas, which I'm converting into a wedding sampler for us. I've made a few changes. I'll be stitching it on PTP Valor, and using silver beads instead of gold, and I've replaced a pinkish color with the DMC 777 you see in the picture. That gorgeous silk is Caron Waterlilies in Cherry. This will be a New Year's Day start.
I also picked up some cotton and a few buttons for a little winter freebie I want to stitch up pretty soon. The fiber is Caron Wildflowers--my favorite fiber EVER--in Evergreen. Isn't that tiny sheep so adorable?
A few other supplies for another winter project.
And here on the first day of winter, a little peek of spring. Sparkly lavender spotted fabric. Since I already had some sparkly pink spotted fabric, I had to have some of this, too. For those of you who are hyperventilating right now, it's from Fabric Flair!