An old La D Da freebie, available here.

A Halloween ornament for Mr. Wonderful from the 2014 Just Cross Stitch Halloween issue.

And a Primitive Bettys freebie, available here.

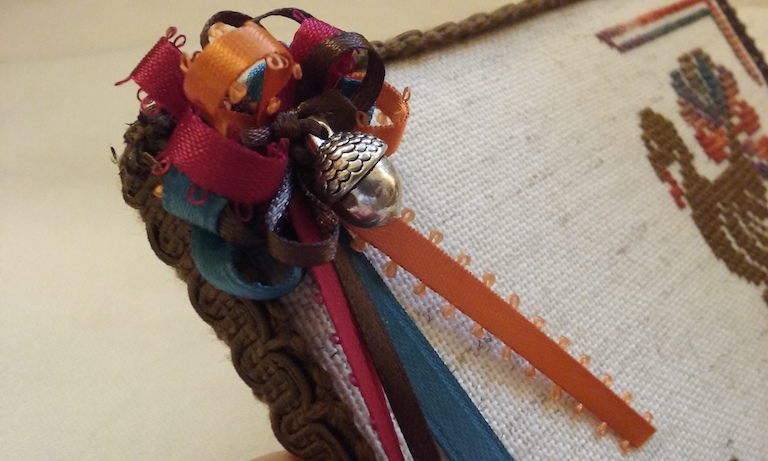
Last fall I posted a few pictures of how I make what I like to call a big splashy bow, which you can see here. Now, y'all have probably noticed from all of these finishing pictures that I'm not wild about bows. I use them occasionally, but they're not my favorite thing. And I really am not a fan of "perfect" bows. I like my bows to look hand-tied (not clipped and sewn) and I like my splashy bows to be slightly messy. As I said in the post I cited above, I think the randomness of the bow is a nice contrast to the precision of the stitching. That being said, sometimes you need to make a bow that's slightly less wild than the one I linked to. You may want it more compact or a certain size. So here's how I make a Big But Slightly Less Splashy Bow.
If you don't have a compass, treat yourself to one (school supply section; they're inexpensive). If you do any amount of finishing you'll find one very useful. Not only can you make perfect round templates in any size, but you can use one for this little trick. After you've decided the diameter of the bow you want to make, draw a circle of that size on a piece of foam core. This will be your guide for how big to make the bow.

Use a pin to poke a hole through the foam core at the point left by the compass in the center of the circle, remove it and then poke a threaded sewing needle through the hole from back to front. Don't pull the needle all the way through the foam core; rather, let the foam core hold the needle upright. This will allow you to use both hands to thread the ribbon onto the needle.

Start building the bow by looping ribbon over onto the needle, using the circle as a guide to how wide the loops should be.


When you have the bow as big as you want it, carefully pull the needle through the foam core and knot the thread. You can use a clothespin to hold the bow together on the needle while you're knotting the thread. When the thread is secure, pull the needle through the bow and put a couple of stitches through the bow to secure it.

Finish the center of the bow with another smaller bow (as in the linked example), a charm, or a button.
And one more thing... these tail feathers! This old boy's tail is stitched with Caron Wildflowers in Fiesta and I couldn't resist showing you a close-up of the beautiful colors in this thread.

Another batch of fabulous finishes, Honeybee! Thank you for the bow tutorial! I really like the acorn charm on Mr. Turkey's bow. That Fiesta thread looks great.
ReplyDeleteWhat a cool bow tutorial!
ReplyDeleteI love all of your finishes! And thanks for the tips on the freebies, and the bow tutorial!
ReplyDeleteLove the bow tutorial! Thanks for sharing! Your work is gorgeous!
ReplyDeleteI love it! Do you cut the foam core circle out? I don't see why you need to make the circle otherwise. Sorry if I'm being a bit stupid.
ReplyDeleteMentioned in the instructions that it's a guide for the diameter of the bow.
DeleteI just discovered your blog. You do the best finishing and have so many wonderful tutes and tips. Thanks for sharing! I'm a true follower now!
ReplyDeleteThank you, Annie--and welcome!
DeleteAmazing thanks for sharing your tutorial
ReplyDeleteJust discovered your blog via the Stats on my group blog!
ReplyDeleteLove your finishing tutorials, especially the Carpe Noctum Bat and this great bow technique. Thanks for sharing.
Thanks, Jo... and welcome!
DeleteI never would have thought of making a ribbon bow like that !! Thank you so much for that..Love your blog and all the neat ideas you post.Your work is awesome...
ReplyDeleteKathi
I love that clever way to make a bow!! Thanks for the tip :)
ReplyDelete