I'll never lose the wonder and pleasure at receiving beautiful things from stitchers I've never met, who send them just because they enjoy my blog and they're sweet!
This beautiful fox chart arrived from Mary Ann in Ohio. I've photographed it against a piece of PTP crystal Da Vinci that has been in my stash forever! I've been saving it for something special, and I think this fox chart is the right project. I'm going for a northern lights look!
Also from Mary Ann, some lovely fox jewelry and a pretty little fox thimble. I have plans to make a needle minder set from the pair of earrings. Thank you, Mary Ann!
More fox goodies from Cheryl in Pennsylvania! A gorgeous fox book and a charming little fox mug, which is now sitting on my work table, holding my work scissors. Thank you, Cheryl!
And finally, a kit from Linda in Texas, who graciously sent it along after she finished stitching hers. Mr. Wonderful is from Houston, so this is much-appreciated! Thank you, Linda!
I am blessed by such kindness and generosity. Thank you to all who visit, comment, and share their love of stitching here.
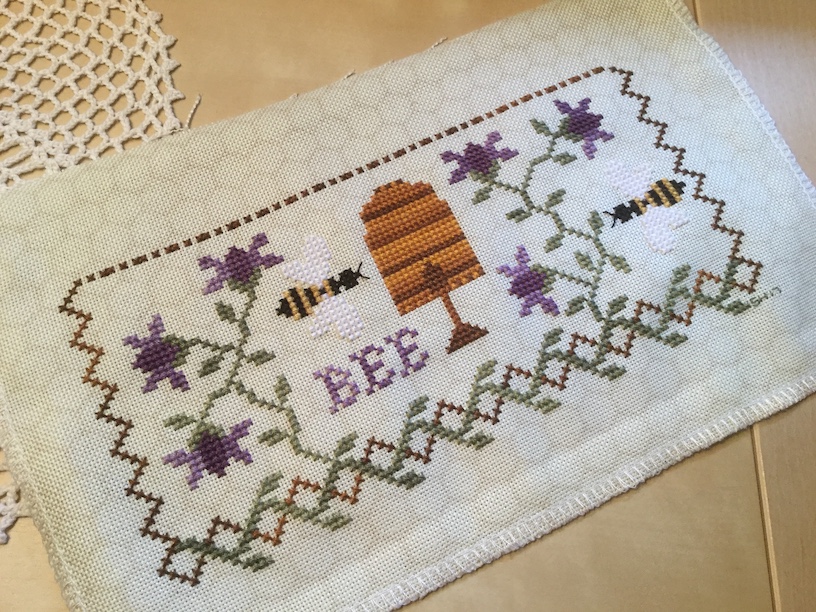
I have a summery finish! This sweet freebie--which is available here--has been in my stash for a while, and so has the honeycomb fabric. I finally got them together!
Fabric: 28 ct. Berkshire Hive from Fabric Flair
My thread choices (Classic Colorworks):
bee skep: Bramble Bush, Sassy Brass
bees: Blackbird, Queen Bee, DMC B5200
flowers: Plum Paisley, Purple Aster
vines: Weeping Willow
border: Bramble Bush
"BEE": Purple Aster
Note: the top wing of the bee on the right is slightly different from the others. If you want them all to be symmetrical, add another row of four stitches to the top wing.
We had torrential rain and a cold front yesterday, and today is glorious. It's the end of July and it's 64 degrees. I have all the windows open. My absolute favorite smell in the whole world is the smell of fresh air wafting through the house. Unless we'll freeze or swelter, I have the windows open, and it's a rare treat to be able to open them in the middle of the summer. Tiger Lily is enjoying the fresh air.
Snackage!
Upcoming projects!
Fresh air, a finish, snacks, a new project, a happy kitty... what could be better? Happy Saturday!
I've decided on the theme for my 4th annual Christmas Open House here on the ol' blog! No, I'm not going to tell you. No, I'm not going to give you hints. Does Santa give hints? No!
If you're a newish follower and haven't checked out my past Christmas Open Houses, just click on the labels on the right sidebar to see what all the fuss is about. I look forward to doing this every year, and I'm really excited about this year. You may think it's nuts to get going on this in July, but I will need all of the next four months to put together something fun for all of us! Because I have to adult and I can't just play in my sewing room. Someone should do something about that.
Stay tuned... it'll be here before you know it!
Goodies in the mail from Rita in Texas: gorgeous Bluebonnet fabric, and two beautiful little charms. These will be perfect for future Texas finishes! Thank you, Rita!
I love green. Look at all the different shades in this single fern.
Spot the deer?
I decided I wanted to fit in one (maybe two?) more summery-ish projects before I turned my attention to Christmas stitching. I start thinking about Christmas every year in July. I've been playing in my stash for the last couple of days, trying to decide what my next few projects will be, and besides this one, they're all Christmas-y. I also need to get serious and make decisions about what fabric I'll be getting during the annual PTP Christmas in July sale, which is only 10 days away! Anyway, speaking of fabric, I've had this piece of Fabric Flair Berkshire Hive in my stash for a while, and I'm really looking forward to seeing how this project will look on it. I went to my LNS yesterday to choose threads. What a blessing it is to have an LNS close by and be able to see and compare colors.
One of my favorite parts of stitching: pretty fabric awaiting the first stitch!
I don't like stitching on deadlines, even though I occasionally impose them on myself, so after the rush of finishing my Texas basket, I wanted to just relax with a quick and easy stitch. The current CEC freebie, which you can find here, caught my eye. It reminded me of that childhood summer activity: catching lightning bugs in a jar, putting the jar beside the bed, and watching their lazy flickering while drifting off to sleep (and dutifully setting them free in the morning). I saw a dialect map today that showed that "lightning bugs" is the preferred terminology in Texas and throughout the south, while the rest of the country calls them "fireflies." I suppose "lightning bugs" would've been too long to fit in the design, but it doesn't matter. Those adorable little bug buttons spoke to me, and I had to stitch it. I immediately ordered the buttons from JABCO, and when they arrived I was delighted to discover they really are fluorescent! (They don't glow in the dark, but they're very bright.)
The chart suggests a cream colored fabric, but I chose 28 ct. denim Jobelan. I wanted my jar to look like dusk, when the lightning bugs rise out of the grass and begin to sparkle. I also wanted them to really "glow" against the darker fabric. I changed every other color, too, and also pared down the number of colors for a more simplified look. Here are my choices, all DMC:
jar: 3753
jar lid: 318, 415
"Sweet Tea": 3826
"&": 415
"Fireflies": 907
flowers: B5200, 744 (Rhodes stitch)
leaves and stems: 3348
attach buttons with 907
***both trims used are from Hobby Lobby
Since this is an unusual shape, I thought I'd include a few finishing pictures. For more detailed descriptions of what's going on in these pictures, see these posts:
How to make rounded corners
How to make a template
The joy of light boxes
Determine the size you want. Mine is 5" x 6".
The bottom corners of the jar can be shaped using the quarter trick.
You'll need a template for the top of the jar. Use your working copy to find the center line of the design and sketch it onto your template paper.
My preferred border of fabric between the edge of the design and the edge of the finish is about 1/4". I measured 1/4" from the side of the jar lid and around the corner of the jar, to make sure my border would be even...
...then I sketched through the measurement marks to get a nice, even border.
Check your template against the design to make sure you've got the shape you want.
And there you have it!
If you want this freebie, go get it and save it now. CEC changes their freebies seasonally and they don't archive old ones.
Now go catch some lightning bugs!
As promised, here are close-ups of my finishes for my Texas basket. The fabric they're sitting on is the fabric I used for the backing.
This little pair of wildflower designs, a Bluebonnet and an Indian Paintbrush, is from an old, out-of-print booklet of Texas designs by Margaret K. Carlson, Designs from Redbone Valley.
The design on the left was created especially for my Texas basket by Holly DeVivo of Misty Hill Studio, and the flag on the right is from the booklet I mentioned above.
I found this leather trim when I raided the cording section (jewelry/leather working) at Hobby Lobby.
Two from Redbird Designs: on the left, the Alamo, from the 12 Days of a Texas Christmas; on the right, an old freebie.
More finds from the cording section at Hobby Lobby. For the design on the right, I braided three colors of leather cord to create the trim I wanted.
This cord comes in more than a dozen colors and is very easy to work with.
And two more from Redbird Designs: Bluebonnet Blooms and Texas Market Basket.
This stretchy, woven ribbon trim is usually used (I think) to make headbands for babies, but it's really perfect for finishing. I used the 1 1/2" wide trim and simply folded it in half and pinned it on. It's hands down the easiest, fastest way to trim a flat finish I've ever tried. It gives you a fluffy look, similar to ruched ribbon, but it's lightning fast. I've seen this stuff for years but never thought about using it until recently. Now I'm hoarding all the colors.
So glad to have this project done! And thanks again for all the encouragement and the kind comments!
Thanks so much to all of you who have been cheering me on in this project! In a couple of days, I'll post close-ups of the finishes and share design info and a couple of new finishing ideas.
If you'd like to see my other baskets, click on the "seasonal baskets" label.