28 August 2017

Small actions = BIG blessings

We spent the weekend watching Mr. Wonderful's hometown of Houston be devastated by Harvey. Thankfully, our families are safe. It seems that for every heartbreaking photo or video of the destruction along the Texas coast, there is another photo or video that makes me want to stand up and cheer. The bravery and selflessness of those who are trying in whatever way they can to relieve the suffering is truly heroic. On Saturday, I told Mr. Wonderful, "I don't have the skills to rescue people, but I could feed the rescuers. I could make sandwiches. I'd make sandwiches and coffee all night." The very next day, I saw a reporter interviewing a soaked, exhausted rescuer. The reporter asked him what they needed, and the first thing he said was, "Someone to make sandwiches."

I cried.

"I CAN MAKE SANDWICHES!" 

We're 1500 miles away from home. I can't make sandwiches. But I will find something I can do.

In the midst of all this, look what arrived in the mail today. How perfect is this?

This sweet gift is from Mary Ann in Ohio. An Alamo key chain (my hometown is San Antonio, Texas), and a pin with several charms that will be perfect for embellishing my Texas finishes. This gift was mailed on Friday, before the storm even hit, and arrived today to cheer me up. Perfect timing. Thank you, Mary Ann. This "small" gesture made such a big difference in my day today.

A long time ago, I posted this quote from Pascal: 

"Little things comfort us because little things distress us."

I mentioned this quote to Mr. Wonderful yesterday, and observed that little things can comfort us when big things are distressing us, too. Never underestimate the power of "little things" to make big differences.

We can't all be the heroes wading through chest-deep water to rescue people. We can't all be on the spot, providing relief to the rescuers and the rescued. But we can all find something to do, and nothing is too small. Nothing.

22 August 2017

I got a new teapot!

Always cause for celebration: a new teapot! We stopped by our favorite local potters' shop on Saturday and I got this little beauty. For more on our pottery obsession, see this post.


I also recently got a new tea wallet. I love these things, and never travel without one. I purchased this one from this shop.


I got this one at an area garden show a couple of years ago. See the little Chow? So cute.

We also took in an art show on Saturday, and I got this beautiful fox print by a local artist. I think she captured such a sweet expression. Her Etsy shop is here (lots of lovely birds).

Haven't had much time for stitching since I finished my last project, but I am getting supplies together for my fall stitching. This luscious silk thread is Autumn Bouquet. Isn't it gorgeous?

I can't believe summer is all but over. I'm spending these last few days of August doing a bit of reorganizing in my sewing room. Mr. Wonderful bought me a new craft table (it's actually supposed to be a dining table, but I'm repurposing it) so I needed to do some shuffling in there. I want it all just so, because I've got a busy fall ahead and I need room to work: finishing, framing, Christmas Open House project, and who knows what else. There's just something about the approach of fall that makes me want to be busy. Probably that "squirrel brain" I've mentioned before...

14 August 2017

Stash Update!

It was a big mail week! Robin in Virginia sent these gorgeous threads; notice what a perfect fox color that Cinnamon thread is! Thank you, Robin!

Holly in Pennsylvania sent these two wonderful books by Gladys Taber. We share a mutual love for dear Gladys, and I have to say, if you've never read her, you're missing a treat. She writes of her home, her garden, her dogs, the seasons--all with a quiet, friendly, conversational voice. If you're feeling overwhelmed by the 21st century world, you could probably do with a visit to Stillmeadow. Thank you, Holly!

Big news! My order from the Picture This Plus Christmas in July sale has already arrived! I was stunned. Last year I waited until October! Whatever the wait, it's always worth it. Top to bottom (all 28 ct. Cashel linen): Dawn, Icon, Oaken, Valor.

I assumed I would have to wait months for my PTP fabric, so I justified ordering all of this. Oops. Top two are Wichelt 32 ct. Petit Point linen in natural/brown and natural/red. Remaining three, top to bottom, are 28 ct. hand-dyed Jobelan in Twilight Mist, Clay, and Antique Copper.

This is a kit I ordered from Sew & So in the UK. Isn't it cute?

And here's a little something I picked up at my LNS. I love this sentiment. I interpret it as a gentle reminder to be willing to put away the devices, look away from the screens, and just be present in the moment.

Speaking of being present in the moment, here's my beautiful girl just a few minutes ago.

Happy Stitching!


08 August 2017

Oh, the miles these paws have seen!

Tiger Lily may be world-famous, but long before she waddled into our lives as a six-week-old rescue, I had dogs. From my late teens through my twenties, I had two beautiful red Chows. For a while now, I've been thinking about them a lot. Remembering them. Missing them. I've often thought about stitching something as a tribute to them, but none of the designs I had seen were quite right. And then I found this one. It was absolutely perfect.

This is "Oh, the Miles" by Goodflora Stitchwort (Etsy). When I saw it, it just tugged at my heart. A joyful dog, running as hard as he can run...

...leash left far behind...

...scattering birds and flowers, trailing muddy paw prints, and catching twigs in his coat.

And that beautiful sentiment: "Oh, the miles these paws have seen!" That simple sentence captures the life of a happy, well-loved dog. It's bittersweet. Beloved dogs, long-since gone, but oh! What a life we had. 


I stitched this design as a tribute to the dogs no longer with me, but it would work just as well as a celebration of a still-present friend. The chart is keyed for DMC, but I converted it to hand-dyed threads. I stuck pretty closely with the original colors, except for the blue and the green, which I brightened up a bit. Here are my choices:

3820-->same
738-->CC Chai
407-->omitted
3045-->CC Straw Hat
931-->CC Morning Glory
580-->GAST Mistletoe
3790-->GAST Maple Syrup
3787-->CC Hickory Sticks
3799-->GAST Soot
***dog's eye is a Smyrna cross in Hickory Sticks
***dog's nose is a Smyrna cross in Soot

If you've got a pupper around the house, give 'em an extra cuddle from me.

05 August 2017

Saturday Sampler: Downpour Edition

What a weird weather week! We had heavy thunderstorms nearly every afternoon. We were also treated to this gorgeous double rainbow. The picture doesn't do it justice. It was the most vivid rainbow I've ever seen, and so large I couldn't fit it in the shot.

Summer downpour

Teeny tiny biscuits (I'm still tweaking this recipe, but Mr. Wonderful devoured eight of these last night.)


Happy Saturday Stitching!

01 August 2017

How to Make Your Own Display Stands

A few days ago, I was thinking about tiny easels, as one does. I got an idea about how to make very simple, inexpensive display stands for flat-finished smalls, and I cleaned up my sewing room just so I could make some! 


These little stands take just minutes to make, and I would have gone on making them if I hadn't had to fold laundry and do other responsible things. Here's how you do it:

If you're making a stand for a regular-sized small finish, these two sizes of craft sticks will do. They're from JoAnn Fabrics and are the mini jumbo (bag of 50) and the mini (bag of 150) size. You'll also need some long beads of some sort. I used wooden ones, but any of this 
size and shape will do. You just need beads long enough to accommodate the width of your finished piece. For a larger stand, just size everything up. (The mini jumbo sticks are like regular popsicle sticks, but wider. The wider width works well for embellishments.)

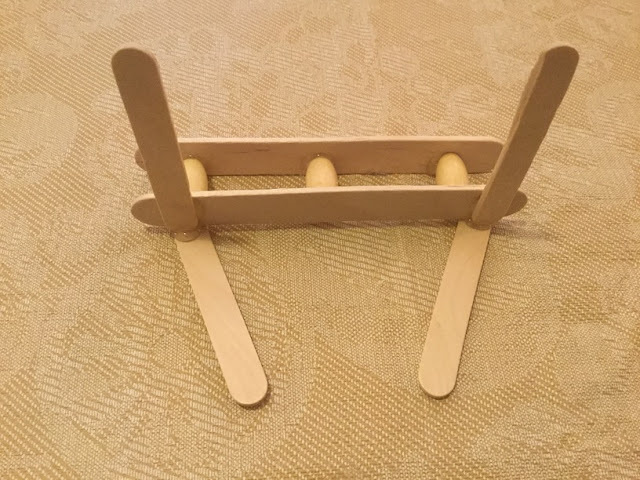
Hot glue a few beads to a mini jumbo craft stick. Make sure to glue them along the lower edge.

Use another craft stick to make sure the beads are even.

Glue another stick to the beads. ***Make sure the beads are glued to the center of the second stick. This will give your stand a slight backward lean.

This picture is of my prototype, where the beads were glued to the bottom edge of both craft sticks. It worked, but I wasn't happy with it so I took it apart and re-glued the second stick as described above. So on yours, the beads should be glued to the middle of front stick. Add a couple of the mini sticks to the back to support the finished piece.

Add a couple more mini sticks and that's it!

Since stitchers like to examine the back of things, here's the back. These Halloween and Thanksgiving finishes are pretty large and these little stands hold them just fine; they're very stable.

To decorate the front, cover the craft stick with ribbon/trim/fabric before you glue it to the beads, but wait to add embellishments until after you've completed the stand. Glue them on to the upright stand. The purpose of this is to make sure the embellishments are even with the bottom of the stand and not below it, which might make it sit unevenly.

As you can see, there's really no end of possibilities with these little stands. Once I had it figured out, I could make one of these--including the embellishment--in less than 10 minutes. They can be made to match specific finishes; the stand holding the Halloween piece is decorated with the same trim used on the finish, and a fuzzy black cat from JoAnn's. The wooden leaves on the Thanksgiving stand are from Hobby Lobby, and the snowflake, deer, and fall buttons (I removed the shanks) are from various craft stores. 

All of these finishes are freebies I've previously blogged, but here are the links again:

Noel freebie

Thanksgiving freebie

Haunted Tea Party freebie