Welcome to the last day of my annual Christmas Open House! All week I've been sharing tea-themed Christmas ornaments, both stitched and crafted. And today I'm sharing--you knew it was coming!--a tea-themed Christmas tree to display them all! I hope you've got a big cup of tea ready, because I've got lots of pictures to share!
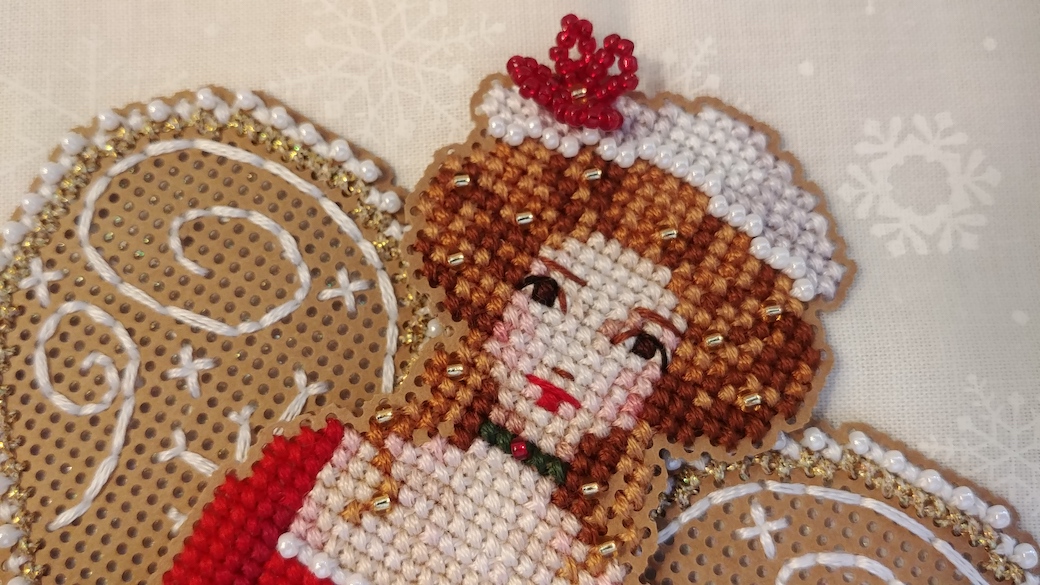
Of course, a Christmas tree needs something beautiful at the tippy top. I stitched up Brooke Nolan's Spirit of Holiday Baking Angel (with some modifications) for the top of my tree.
I gave her brown eyes and changed her hair color from red to golden brown (DMC 433, 435, 436).
I charted up a simple teacup to match the teapot on her tray, and used the same color scheme.
I omitted all of the baking-related items, and the pocket on her apron, but used the pretty motif from the pocket to decorate the apron (red Petite Treasure Braid).
For her wings, I tried something new. Instead of using regular card stock to back the wings, I used heavy glitter paper, with the glitter facing the front of the design. To attach the paper to the wings, I used a thin line of glue around the edge of the wings (on the back of the stitched/beaded border) and in the center of her back to avoid any glue obscuring the glitter. It turned out really well. It's difficult to capture in a picture, but her wings have a lovely subtle sparkle. Perhaps you can see it a bit on the lower part of the wing.
And here's my tea-themed Christmas tree!
Sources for the ornaments I stitched and crafted are in this week's posts.
Links to additional sources:
chocolate Christmas tree
lemon slices
small polymer clay candy canes
glittery snowflake background fabric: Jo Ann Fabrics
*****
And that's another year's Christmas Open House done and dusted! I hope you've enjoyed the week here, and I thank you all so much for visiting and leaving such kind comments. Let's plan to meet up again this time next year because I've already chosen my theme for my 6th annual Christmas Open House! How's that for getting a jump on Christmas?
Merry Christmas, y'all!
Another sleepy little Christmas visitor! This sweet mouse is from the Leisure Arts book 101 Christmas Minis Book 2. He's stitched on 32 ct. red/natural petit point linen with DMC.
How about some tiny teapot ornaments? These couldn't be simpler. All you need are some small Christmas ornaments, some pipe cleaners, some embellishments, and a hot glue gun. The teapot lid is a couple of tiny buttons with a crystal bead on top.
Time for more Tiny Baking! I found a 3-cup bundt pan at Wal-Mart a while back, and launched a search for recipes. This recipe for Vanilla Pound Cake from Nordic Ware makes this adorable baby bundt:
Isn't that just the cutest? It's the perfect size for you and a friend or two. The slices are teeny tiny and precious. I don't know what brand my baby bundt is, but there's a link to a Nordic Ware 3-cup bundt pan on the recipe page. Two notes: 1) If you go looking for recipes, be aware that most references to a "mini" bundt pan are talking about a 6-cup pan (regular is 10-12 cup), not a 3-cup pan, which are sometimes called "baby" bundts; and 2) I baked this one for the full 35 minutes, placing some foil around the outer edges at about 25 minutes to keep them from getting too brown. I used this recipe for the Vanilla Bean Glaze, scaled down to 1/4.
Since it's a lot easier to find recipes for 6-cup cakes than 3-cup cakes, the obvious solution is to get two 3-cup pans, bake two little cakes, keep one, and share the other!
Come on back tomorrow for the last day of my Christmas Open House.
Day three of my annual Christmas Open House! If you're just joining us, scroll back to Monday to catch up... and stick around til Friday for the big finale!
I had so much fun with last year's Flavors of Christmas I had to revisit the idea this year. These little word ornaments are quick and easy and are adaptable to absolutely any theme. Just choose an alphabet you like and let your imagination go. These tea ornaments are stitched on 28 ct. mystery linen using Caron Wildflowers in Copper, Snow White, Forsythia, and Caramel, and DMC Etoile Blanc (sugar). The charms are from this Etsy shop. The alphabet I used can be found here.
Here are some super simple tea tag ornaments that turn out much cuter than they have any right to, considering how little effort goes into them.
I found the wooden tags at Jo Ann Fabrics. Christmas stickers from Hobby Lobby; tiny letter stickers from Michael's.
What to do with left over tags and stickers? Super cute gift tags, of course!
More tomorrow!
Welcome back! Today I have an elegant little teacup ornament to show. This design is available from this Etsy shop. I used gold Petite Treasure Braid to give it a bit of sparkle!
I made what I'm calling "Spoonful of Sugar" ornaments using the small plastic spoons from a tasting set. Tasting sets are sets of mini spoons and cups (usually plastic or porcelain), and can sometimes be found in the grocery store. The tiny spoons are great for crafts.
The sugar cubes are made from small wood cubes (Hobby Lobby) painted white and dusted with glitter.
If we're having a Christmas tea, we need gingerbread. Those of you who've been around a while will know that one of my loves is small-batch baking. (If you need to catch up, check out these posts.) This recipe for a mini gingerbread loaf is lovely. The recipe says it should be baked 33-40 minutes, but I found mine was done after about 30 minutes. Just the right amount of spice and excellent with a cup of tea!
Have a great day, and see you back here tomorrow!
Welcome to my 5th annual Christmas Open House! All week I'll be sharing tea-themed Christmas ornaments, both stitched and crafted. Brew yourself a cup of tea and meet me here every day for some Christmas cheer!
This adorable Christmas visitor is a Casey Buonaugurio design from the December 2008 issue of Just Cross Stitch magazine. He's stitched on 28 count mystery linen with DMC.
These sweet teacup ornaments are not difficult to make, although if you've never worked with epoxy resin, they can be a bit tricky. I was inspired by this post and used the supplies she recommends. Any small teacup can be used, doll or child-sized.
We can't have tea without something to nibble on, so I'll be sharing a few recipes this week, too. Today's recipe is for Lemon Stars.
The original recipe says it makes nine dozen using a 2" cookie cutter. I cut the recipe in half, and then used only half the dough (so, 1/4 of the original recipe), and used a tiny 1.5" cookie cutter. I got 40 tiny stars out of it. This is a very versatile recipe as it makes a ton, but scales down easily, and can be flavored any way you like. If you make these tiny, as I did, beware! You're more likely to just pop them in your mouth as you pass by the cookie tray!
Lemon Stars (original quantities for nine dozen)
1/2 c. butter-flavored shortening
1 c. sugar
1 egg*
1 1/2 tsp. lemon extract
1/2 c. sour cream
1 tsp. grated lemon peel
2 3/4 c. flour
1/2 tsp. baking soda
1/2 tsp. salt
Glaze: 1/2 c. powdered sugar, 1/2 tsp. lemon zest, 2-3 tsp. lemon juice
Cream shortening and sugar until light and fluffy. Beat in egg and extract. Stir in sour cream and lemon peel. Combine the flour, baking soda, and salt; gradually add to the creamed mixture and mix well. Divide dough into three balls; cover and refrigerate for 3 hours or until easy to handle.
Remove one portion of dough from the refrigerator at a time. On lightly floured surface, roll out dough to 1/4" thickness and cut with floured 2" cookie cutter. Place 1" apart on uncreased baking sheets and bake at 375 for 6-8 minutes or until edges are lightly browned. Remove to wire racks to cool. Glaze when cool.
*To scale down a recipe that uses one egg: break the egg and lightly mix it (don't beat it as you would for scrambled eggs); pour into a small liquid measure and divide as needed. I used about 2 Tbsp. of the mixed egg in the halved recipe, but that will vary depending on the size of the egg you're using.
*****
Thanks for dropping in... see y'all tomorrow!